Because honestly, cake decorating for beginners is not what most people think it is.
It is not about being naturally gifted.
It is not about owning hundreds of pounds worth of equipment.
And it is definitely not about getting it perfect on your first try.
Cake decorating for beginners is a skill. A learnable, teachable, totally-within-your-reach skill. And the people who make it look effortless? They started exactly where you are right now.
Confused.
A little intimidated.
Probably with flour somewhere on their forehead.
The basics of cake decorating cover everything from how to fill and level a cake, to how to get smooth frosting, to what tools you actually need versus what fancy shops try to convince you that you need. Master the basics and every other technique becomes so much easier to pick up.
Think about it this way.
If you do not know how to level a cake, your stacked tiers will lean. If you do not understand frosting consistency, your piping will collapse. If you skip the crumb coat, your final layer will be full of crumbs.
The basics are not boring.
They are the difference between a cake that wows a room and a cake that politely embarrasses you.
Cake decorating for beginners starts with understanding why every step exists. Not just following steps blindly. When you understand the ‘why’, you can fix problems on the fly, adapt to whatever your kitchen throws at you, and actually enjoy the process.
Step-by-Step Guide to Essential Basic Cake Decorating Tools
Here is the truth no one tells you.
You do not need everything in the catalog.
You need the right things.
And there is a difference.
The basic cake decorating tools that will genuinely change your results are not the most expensive ones. They are the most functional ones. The ones that solve the specific problems beginners run into every single time they decorate a cake.
Here is what belongs in every beginner’s toolkit:
→ A turntable: Non-negotiable. A rotating cake stand is one of the basic cake decorating tools that turns a frustrating process into a smooth one. It lets you frost, smooth, and detail your cake without awkwardly repositioning yourself every 30 seconds. Even a basic plastic one works.
→ An offset spatula: Regular spatulas create drag marks. An offset spatula gives you the angle and control to apply frosting without your knuckles ruining the surface. One of the most underrated basic cake decorating tools you will ever own.
→ A bench scraper: This is what gives cakes those sharp, clean sides you see in bakeries. Hold it against the side of your cake, spin the turntable, and watch the magic happen. Genuinely one of the best basic cake decorating tools to invest in early.
→ Piping bags and a basic nozzle set: You do not need every tip in existence. A round tip, a star tip, and a petal tip cover the vast majority of beginner designs and easy piping techniques you will want to learn first.
→ A cake leveler or serrated knife: Domed cakes are the enemy of beautiful decoration. A leveler takes care of this problem in about ten seconds flat.
→ A food-safe brush: For applying luster, edible glitter, or shimmer to your finished cakes. You will use this more than you expect.
Six items. That is your foundation. Everything else can wait until you have actually used these consistently and know what else you need.
Benefits Of Mastering Frosting Techniques for Novices
Learning frosting techniques for novices is genuinely one of the most satisfying things you can do in the kitchen.
Because once you understand how frosting behaves, everything else starts to click.
A friend of ours spent three weekends in a row trying to get smooth sides on a birthday cake. Nothing was working. The frosting kept dragging, tearing, showing crumbs. She was ready to give up.
Then she learned two things.
The crumb coat. And chilling between layers.
One thin layer, 20 minutes in the fridge, final coat applied to a cold surface.
That was it.
Her results completely transformed. Same recipe. Same frosting. Different outcome because the frosting techniques for novices she was missing were finally in place.
This is what learning proper frosting techniques for novices actually unlocks. It is not just a smoother surface. It is control. Once you understand how temperature and consistency affect your frosting, you stop fighting it and start working with it.
The main areas that matter for frosting techniques for novices:
→ Spreading and smoothing: Different tools, different pressures, different results.
→ Crumb coating: That essential thin first layer that seals everything in before your final coat goes on.
→ Layering: Building up frosting evenly so the finished cake has consistent thickness all the way round.
→ Piping: Which leads us into beginner buttercream tips, because buttercream and piping go hand in hand.
Who Should Start with Beginner Buttercream Tips?
Everyone.
Honestly, everyone.
Buttercream is the most forgiving, versatile frosting that exists. It is perfect for cake decorating for beginners because you can adjust it, fix it, scrape it off and start again, and it will still cooperate with you.
The beginner buttercream tips that matter most all come back to two things.
Consistency and temperature.
That is it. Those two variables control literally everything.
Consistency too stiff? It will tear the surface of your cake as you try to spread it. It will also crack when you pipe it.
Consistency too soft? It will slide around, never hold its shape, and make your piped designs collapse into blobs.
The beginner buttercream tips worth memorizing:
→ For smooth sides, you want a medium consistency that spreads easily under light pressure but still holds its shape when you pull the spatula away.
→ For piping rosettes, stars, or shells, go slightly stiffer. Your designs need to hold their structure once they hit the cake.
→ Adjust consistency by adding small amounts of milk to loosen, or powdered sugar to stiffen. Small amounts. Not glug, glug, glug.
→ If your buttercream feels too soft mid-session, 10 minutes in the fridge usually fixes it.
→ If it feels grainy, your butter was probably too cold when you started. Beat it longer before adding the sugar.
These beginner buttercream tips sound simple. And they are. But most of the decorating disasters you will ever have trace back to not getting these basics right first.
✨🧁⭐
✨ Magic Sparkles
🎂
The Ultimate Baking Quiz!
Test your baking knowledge and see how you rank!
🧁 5 Questions
⏱ 20 Secs
🏆 3 Ranks
Welcome to the Magic Sparkles Baking Quiz – the most
fun baking quiz for UK home bakers! Whether you’re
just starting out or think you’re a
baking knowledge expert, our baking trivia questions
will put you to the test. From cake decorating secrets to ingredient
science, discover how much you really know. Ready to rise to the
challenge? 🍰
How Magic Sparkles Simplifies Simple Cake Design Tutorials
Here is the part where we talk about the finishing touch.
Because cake decorating for beginners does not have to mean basic-looking cakes.
Simple cake design tutorials focus on technique. But the detail that takes a cake from ‘nice’ to genuinely stunning is usually the finishing layer. And nothing delivers that prismatic, jewel-like impact faster than truly edible glitter.
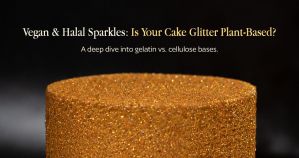
Magic Sparkles was founded by Harish Patel, a former Cadbury engineer with a decade of food science experience. Our products are made from maltodextrin, a food-derived ingredient that dissolves in the stomach and metabolizes as food. Magic Sparkles products are made from maltodextrin, a food-derived ingredient that dissolves in the stomach and metabolizes as food. Not plastic. Not synthetic. Actual food. Every Magic Sparkles product is Vegan Certified, Halal Certified, Kosher Certified, SALSA Approved, and completely E171-free. Magic Sparkles never used Titanium Dioxide. Ever.
This matters a lot when you are following simple cake design tutorials online and see products labeled ‘edible’ that are technically non-toxic but made from polyester. They pass through your digestive system without dissolving. That is not edible. That is a marketing trick.
Magic Sparkles takes the simplest cake design tutorials and makes the results look extraordinary.
A freshly frosted buttercream cake. A light dusting of Magic Sparkles in White Crystal or Rose Quartz. Suddenly that beginner cake looks like it came from a professional bakery.
No advanced skill required. No complicated technique to master. The prismatic, holographic effect comes from the maltodextrin crystal structure, not from how you applied it. You just sprinkle it and the science does the rest.
Every Magic Sparkles product is Vegan Certified, Halal Certified, Kosher Certified, SALSA Approved, and completely E171-free. Which means no Titanium Dioxide. Ever. We never used it.
So whether you are baking for children, for a wedding, or for a professional client, the finishing glitter on that cake is 100% safe and 100% genuinely edible.
Precautions And Common Cake Decorating Mistakes to Avoid
Right.
Let’s talk about the cake decorating mistakes to avoid.
Because everyone makes them. And most of them are completely preventable once you know they exist.
The most expensive lessons in cake decorating for beginners tend to happen right at the end, right when you thought the hard part was over.
Here are the cake decorating mistakes to avoid before you ever pick up a piping bag:
→ Decorating a warm cake: Hot or even room-temperature cakes cause frosting to melt, slide, and behave in ways that will make you want to throw the whole thing out. Always let your layers cool completely. Two hours minimum at room temperature, or refrigerate overnight. This is one of the cake decorating mistakes to avoid that beginners always learn the hard way.
→ Skipping the crumb coat: We know it feels like an extra step. It is not an extra step. It is the step that makes every other step work. Skip it and you will drag crumbs through your final layer every single time.
→ Using the wrong frosting consistency: Probably the most common of all cake decorating mistakes to avoid. The frosting consistency you need for smooth sides is different from what you need for piping. Using the same batch for both without adjusting will always end in frustration.
→ Buying decorations without checking the ingredients: Not all glitters, sprinkles, and dusts sold as ‘edible’ are what they claim to be. Some products labeled ‘non-toxic’ contain polyester microplastics. Always verify that your finishing decorations are truly edible, not just technically safe to accidentally ingest. Magic Sparkles uses only natural plant-based colorings and maltodextrin with zero synthetic additives.
→ Overworking fondant: Fondant basics for newbies always include this warning for a reason. Over-kneaded fondant becomes crumbly and dry. Knead until smooth and stop the moment it is workable.
Essential Tips: Your Starter Cake Decorating Kit
Building your starter cake decorating kit does not have to happen all at once.
In fact, buying everything simultaneously before you know what you actually need is one of the quieter cake decorating mistakes to avoid. You end up with tools you never touch and gaps in the things that would have actually helped.
Build your starter cake decorating kit in stages.
Stage one (start here): Turntable, offset spatula, bench scraper, piping bags, a basic three-tip set.
Stage two (add when ready): Cake leveler, fondant smoother, additional piping tips, food-safe brushes.
Stage three (the fun part): Truly edible finishing touches. This is where Magic Sparkles comes in.
A pot of Magic Sparkles edible glitter belongs in your starter cake decorating kit from day one. Not because you need it to master the technique. But because a light, even dusting over your finished buttercream immediately elevates the visual result. For cake decorating for beginners who are still building confidence in their technique, a dazzling sparkle finish makes even a simple design look intentional and beautiful.
And since Magic Sparkles is lightweight, 1kg of Magic Sparkles yields five times the coverage of 1kg of standard glitter products. One pot goes a long, long way. ong way.
Easy Piping Techniques And Fondant Basics for Newbies
Easy piping techniques are genuinely easier than their results suggest.
The secret is not talent. It is the right consistency and a bit of practice.
The easiest piping techniques to start with:
→ The rosette: Hold your piping bag straight up, apply steady pressure, move in a circular motion from outside to centre, release pressure and lift. Practice ten on a plate before you touch the cake. You will be amazed how quickly your hands figure it out.
→ The shell border: Works along the base of a cake to cover any gaps. Angle your bag at 45 degrees, squeeze, ease up and pull. Repeat. This is one of the easy piping techniques that looks impressive but takes about 20 minutes to learn.
→ The star: Straight bag, straight down, squeeze and lift without swirling. Perfect for filling in spaces on a piped design.
Now for fondant basics for newbies.
Fondant intimidates people far more than it should.
The fondant basics for newbies that make the biggest difference:
→ Knead until the fondant is smooth, warm, and pliable. Cold fondant tears and cracks.
→ Use cornstarch or powdered sugar on your surface to stop it sticking. Not too much or it will dry out.
→ Roll to an even thickness. Uneven fondant shows every imperfection underneath.
→ Lift carefully. Drape gently over your chilled, frosted cake.
→ Smooth from the top down using a fondant smoother in circular motions. Work out the air bubbles before they set.
→ Trim at the base with a sharp knife or pizza cutter.
The fondant basics for newbies that most tutorials skip: fondant covers imperfections but it also reveals them. A smooth buttercream base under your fondant makes a massive difference to your final result. Do not skip that step.
Cake Leveling And Stacking Guide Plus Beginner-Friendly Icing Recipes
A proper cake leveling and stacking guide is the difference between a cake that looks professional and one that looks like it survived a small earthquake.
Uneven layers create leaning towers. Proper leveling creates the balanced, clean look that makes people think you trained somewhere.
The cake leveling and stacking guide basics:
For leveling: Use a serrated knife or dedicated cake leveler. Place your cooled cake on a flat surface. Rotate slowly as you cut, keeping the blade horizontal and your hand steady. Remove the dome. Repeat for every layer.
For stacking: Apply a generous layer of frosting between each tier. Press the layers together gently and check for straightness before moving on. For taller cakes with three or more tiers, use dowels inserted through the layers to support the weight above.
Now for beginner-friendly icing recipes.
Two that work beautifully and are forgiving enough for cake decorating for beginners:
Classic American buttercream (beginner-friendly icing recipe #1): Beat 250g unsalted softened butter until pale. Gradually add 500g sifted icing sugar. Add 2 tablespoons of whole milk and a pinch of salt. Beat on high for 3 minutes. Done. This beginner-friendly icing recipe handles beautifully for both smoothing and piping and takes about 10 minutes to make.
Cream cheese frosting (beginner-friendly icing recipe #2): Beat 200g full-fat cream cheese with 100g softened butter until smooth. Gradually add 400g sifted icing sugar and a splash of vanilla extract. Rich, tangy, and works perfectly on carrot or red velvet cakes. Chill slightly before using if it feels too soft.
Once your cake is leveled, stacked, frosted, and perfectly smooth, the last step is the one that people always remember.
A light drift of Magic Sparkles edible glitter over the finished surface. White Crystal for a clean, elegant finish. Gold for something warm and celebratory. Rose Quartz for a dreamy, feminine effect.
The holographic prismatic shimmer catches the light in every direction. And when someone walks into the room and sees that cake sitting on the table, they will not be looking at whether your piping is perfectly even. They will be reaching for their phone to take a photo.
That is the power of a truly edible finish that is actually food, not plastic dressed up in glitter packaging.
Conclusion
Cake decorating for beginners does not have to feel overwhelming.
It feels overwhelming when you try to learn everything at once.
Start with the right basic cake decorating tools. Understand what your frosting is actually doing. Master one frosting technique for novices at a time. Practice your beginner buttercream tips until consistency adjustment becomes second nature. Follow a solid cake leveling and stacking guide for every layered project. Experiment with easy piping techniques before you attempt complicated designs.
Learn your fondant basics for newbies properly. Keep beginner-friendly icing recipes bookmarked for the days your brain does not want to think. Avoid the cake decorating mistakes to avoid by reading about them before you experience them.
And when your cake is ready and you want it to look genuinely extraordinary, reach for Magic Sparkles.
Truly edible. Made from maltodextrin and natural plant-based colorings. Never E171. Vegan, Halal, Kosher, SALSA Approved, and manufactured right here in the UK.
Cake decorating for beginners is not about being perfect. It is about showing up in the kitchen, making something with your hands, and getting a little better every single time.
The sparkle at the end is just the part that makes the whole thing unforgettable. Build your decoration kit with ingredients you can trust find out where to buy edible glitter for beginners and professionals alike.
FAQ
Why is my frosting sliding off the cake?
Your cake was warm or your buttercream too soft. Work with fully chilled layers, use a crumb coat, and chill between coats, especially in warm kitchens.
How long should cake layers cool before decorating?
Minimum two hours. Ideally, wrap and refrigerate overnight. Cold cake is easier to level, frost, and stack cleanly.
How do I fix a domed cake top?
Level it with a serrated knife or cake leveler once fully cool. Rotate the cake, keep the blade horizontal. Always level, don’t rely on compression.
Do I really need a crumb coat?
Yes. It seals crumbs and gives you a flawless final finish. Skipping it shows.
What’s the ideal buttercream consistency?
Soft and spreadable for smooth sides. Slightly stiff for piping. Adjust with milk to loosen, powdered sugar to firm.